DeFi stands for decentralized finance, which means operating financial applications on a decentralized platform such as blockchain. It is the new financial architecture that leverages decentralized networks and decentralized technologies such as smart contracts to transform old financial products into trustless and transparent protocols that run without intermediaries.
In contrast, centralized finance means a single organization such as a bank controls and manages the funds of the clients. This kind of centralized control has many weaknesses, including the abuse of funds and manipulation of personal data, frauds, single point of failure due to hacking, and more.
Decentralized finance has many advantages as it’s aligned with the characteristics that blockchain technology possesses.
The Advantages of DeFi
Maintain Full Control of your own digital Assets
The digital assets that you own on a DeFi platform solely belong to you alone and you have the freedom to use it in whatever ways you like, without the interference of an intermediary. There is no centralized authority, such as a bank, with the ability to freeze your account, seize your assets, or block your transactions.
Increased Accessibility
According to the World Bank, globally there are still approximately 1.7 billion unbanked adults. These people are at a disadvantage when it comes to pursuing many financial opportunities that could improve their socioeconomic status and lift them out of poverty.
Unfortunately, centralized financial institutions don’t have an incentive to target this population. The revenue they would receive from providing services to the currently unbanked simply doesn’t justify the costs of reaching them. In contrast, DeFi providers operate without expensive intermediaries hence they are more willing to serve the underprivileged people. Furthermore, DeFi is borderless and ‘permissionless’ hence everyone on earth particularly the unbanked population can access this form of affordable financial services. Therefore, DeFi has the potential to reduce the world’s poverty.
Opportunity to own a portion of an expensive asset
Another DeFi application is tokenized assets. Tokenizing assets is creating digital tokens to represent the ownership of real assets that can be traded like securities such as shares. By creating tokenized assets that represent, say, a portion of a real estate investment, you open up the investment for people who previously couldn’t afford it, to having access from anywhere in the world. Almost anyone can trade tokenized assets as he or she is not required to commit to an entire high-value investment at once. Instead, he or she has the option to buy or sell just a portion of the asset.
Transparency
DeFi data is publicly available, enabling you to keep service providers honest. For instance, you can easily check the reserves of a DeFi bank, shop around for accurate loan rates, or even track the transactions of public figures.
Let’s examine a well known use case of DeFi, the Maker DAO
Maker DAO
MakerDAO is an open-source project on the Ethereum blockchain and a Decentralized Autonomous Organization created in 2014. The project is managed by people around the world who hold its governance token, MKR.
MakerDAO is a decentralized credit platform on Ethereum that supports Dai, a decentralized, unbiased, collateral backed stablecoin whose value is pegged to USD. The Maker Protocol which is known as Multi collateral Dai (MSD) allows users to mint Dai by leveraging collateral assets approved by the Maker Governance. Maker Governance is a community organized and operated process of managing various digital assets of the Maker Protocol.
The Maker Protocol is one of the largest dApps on the Ethereum blockchain. It was the first DeFi application to gain significant adoption among the crypto communities. Since the release of Single Collateral Dai in 2017, user adoption of this stablecoin has increased dramatically. Indeed, It has become a driving force in the DeFi movement. The Maker Protocol is designed by a diverse group of individuals that include developers, external partners, other persons, and entities. It is managed and governed by people who hold the governance token MKR through a system of scientific governance involving executing voting and governance polling.
Anyone can use the Maker Protocol to open a Collateralized Debt Position (CDP), lock ETH as collateral, and generate Dai as a debt against that collateral. Dai debt incurs a stability fee (i.e., continuously accruing interest), which is paid (in MKR) upon repayment of borrowed Dai.
The MKR is burned, along with the repaid Dai. Users can borrow Dai up to 66% of their collateral value (150% collateralization ratio). CDPs that fall below that rate are subject to a 13% penalty and liquidation (by anyone) to bring the CDP out of default. Liquidated collateral is sold on an open market at a 3% discount.
Holders of Maker’s other token (MKR) govern the system by voting on, e.g., risk parameters such as the stability fee level. MKR holders also act as the last line of defense in case of a black swan event. If the systemwide collateral value falls too low too fast, MKR is minted and sold on the open market to raise more collateral, diluting MKR holders.
I shall discuss more DeFi use cases in coming articles.
The event management and ticketing industry is a huge market, particularly the event management software market. Markets Insider reported that the Event Management Software Market is projected to grow from USD 5.7 billion in 2019 to USD 11.4 billion by 2024, at a CAGR of 15% from 2019 to 2024.
However, despite the great potential of the event and ticketing industry, there are numerous problems and issues plaguing the current centralized event ticketing industry. The main issues include ticket counterfeiting, ticket scalpers, instant sell-outs and overpriced resale tickets on secondary markets (EventChain, 2017).
The good news is that the blockchain could fix the aforementioned issues. A blockchain is a distributed digital ledger that can be used to record transactions and other data across a decentralized peer-to-peer network made up of a cluster of computing devices.
Using blockchain technology, every ticket sales can be publicly verified, and thus the authenticity of the ticket can be guaranteed. It is also able to prevent fraudulent sales and counterfeiting. It sets rules (using smart contracts) preventing secondary ticket websites from hoarding tickets and charging inflated prices for premium events. If the rules are broken, the fraudulent accounts are frozen and the tickets are made invalid.
In a nutshell, a blockchain-based event and ticketing system has the following benefits:
Elimination of ticket duplication and counterfeit tickets
Elimination of scalpers
Elimination of ticket touts and purchasing bots
Fully transparent ticketing aftermarket
Automatic refund at the time of cancelation
Use Cases
BitTicket
The Edinburgh-based Citizen Ticket is an event ticketing platform backed by blockchain technology that uses the cryptocurrency Ethereum Classic. In May 2017, they deployed the blockchain-based ticketing system BitTicket and delivered the first live event using blockchain technology.
BitTicket is a ticket delivery service that event organisers, venues, and artists can use to secure their tickets with blockchain technology. BitTicket provides users with one wallet QR code that holds all their BitTickets securely, no matter which ticketing provider they bought them from. They simply present it along with proof of ID to gain entry. Due to the security of BitTicket identity, ticket transfer to friends and family can be done easily and with assurance. BitTickets are immutable, transferable, and verifiable.
BitTicket guarantees the following:
Your purchased ticket is genuine
Inherent protection against industrial-scale ticket touts and ticket purchasing bots
Transfer your tickets securely and with ease between friends & family
Provides one wallet for all your tickets – no more individual tickets
GUTS
GUTS uses blockchain technology to create a transparent ticketing ecosystem where inflated secondary market prices and ticket fraud are eliminated. Their motto is simple, transparent and secure.
GUTS brings numerous benefits for different stakeholders:
Artist and Managers
A fair chance for all the fans to attend the show
Expand the fan base with exact data
Direct communication with your fans. Send them a message right before the show starts.
The Venue, Festival and Theatre Operators
No ticket fraud: fewer complaints and a stronger image
You know exactly who is present at any time (and who isn’t)
Automatic refund procedure at the time of cancelation or resale
Identification via mobile phones means shorter queues
Ticket Providers
Complete control of the tickets in both the primary and secondary market
Easy to integrate with existing ticketing solutions
LAVA
LAVA is a blockchain-based ticketing system that guarantees fair and secure smart tickets for music lovers. The system prevents ticket touting and fraud ruining festivals for music lovers.
The LAVA ecosystem has the following features:
100% Safe
Using latest blockchain technology to eliminate ticket fraud
Smart Tickets
Smart tickets to stop the exploitation of festival tickets using a unique digital footprint
Lava Wallet – Eliminate printing completely by generating the ticket digitally and sending the digital ticket to the Lava wallet directly
No booking fee
PouchNATION
PouchNATION is an event management software system that uses the blockchain technology to good effect. PouchNATION is the first platform to implement blockchain and new digital currency across all verticals in event management. Its components comprise guest registration, cashless payment, access control, activity tracking, social engagement and detailed analytics reporting.
This innovative platform could overcome issues that the ticket industry is currently facing with managing events, attendance tracking apps, eliminating duplicate tickets, and validating registration at the door.
They have executed over 100 events including cashless events in Indonesia, Philippines, Vietnam, Malaysia, Thailand, and Myanmar.
EventChain
EventChain is a global Smart Ticketing blockchain project that will allow events worldwide to sell SmartTickets through a peer-to-peer network, solving the issues of the centralized event ticketing industry.
It implements the EventChain token network for event management to ensure faster transactions, indisputable ticket vouchers, transparency from event hosts and fully flexible and programmable SmartTickets. With the use of the EVC token, smart contract code, and the Ethereum blockchain, EventChain’s transaction network brings increased accountability, transparency, and security to event ticketing.
To fix the excessive ticket fees, EventChain is distributing EVC tokens, a digital ERC20 token created for buying, selling, and programming SmartTickets on the Ethereum distributed network. EventChain claims that their transaction fees are much lower and the transaction confirmation speed is near seconds.
Event Management and Ticketing Platform-A Conceptual Model
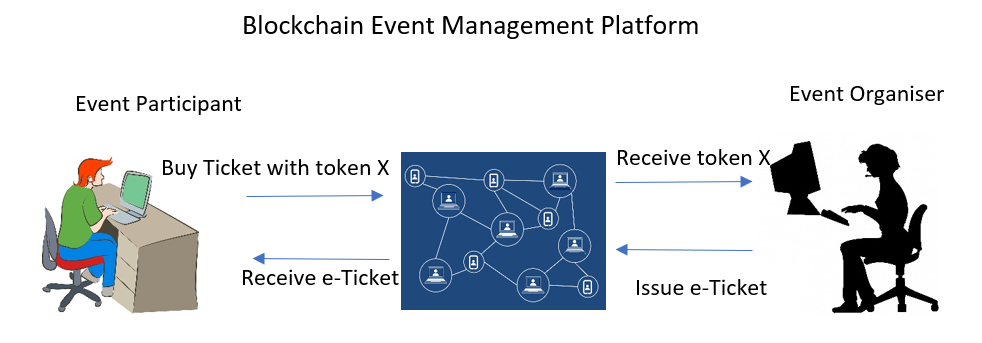
After examining the above use cases, I propose a conceptual model that utilises a similar concept to develop a blockchain-based event management and ticketing platform. Below is a simple conceptual model of the Event Management and Ticketing Platform:
The platform allows an event organizer to create an event and broadcast it to the website as well as a mobile wallet. The event should comprise details such as event title, date, time, venue, and a ticketing ordering button. The participant can then order tickets by paying Token X. Once the organizer receives Token X, the e-ticket shall be automatically delivered to the participant’s mobile wallet. To enter the event venue, the organizer just needs to scan the e-ticket of the participant.
To build the platform, we need to build a smart contract layer on top of blockchain network to automate the buying and selling of event tickets. We shall use Solidity to write the contracts. There shall be at least three smart contracts -the ERC20 token contract(to generate Token X), the event contract, and the ERC721 ticket contract. The event contract will need to link to the ticket contract as it needs to use the data in the ticket contract. The keyword to access the data in another contract is import. For example, we can create an event contract event.sol that imports the ticket contract ticket.sol, using the syntax as follows:
Pragma Solidity ^0.5.0
import "./ticket.sol";
The event.sol file shall create an event contract that specifies event details such as total tickets, collected funds, start time, etc. The code could be as follows:
The event management and ticketing industry is a huge market, particularly the event management software market. Markets Insider reported that the Event Management Software Market is projected to grow from USD 5.7 billion in 2019 to USD 11.4 billion by 2024, at a CAGR of 15% from 2019 to 2024.
However, despite the great potential of the event and ticketing industry, there are numerous problems and issues plaguing the current centralized event ticketing industry. The main issues include ticket counterfeiting, ticket scalpers, instant sell-outs and overpriced resale tickets on secondary markets (EventChain, 2017).
The good news is that the blockchain could fix the aforementioned issues. A blockchain is a distributed digital ledger that can be used to record transactions and other data across a decentralized peer-to-peer network made up of a cluster of computing devices.
Using blockchain technology, every ticket sales can be publicly verified, and thus the authenticity of the ticket can be guaranteed. It is also able to prevent fraudulent sales and counterfeiting. It sets rules (using smart contracts) preventing secondary ticket websites from hoarding tickets and charging inflated prices for premium events. If the rules are broken, the fraudulent accounts are frozen and the tickets are made invalid.
In a nutshell, blockchain-based event and ticketing system has the following benefits:
Elimination of ticket duplication and counterfeit tickets
Elimination of scalpers
Elimination of ticket touts and purchasing bots
Fully transparent ticketing aftermarket
Automatic refund at the time of cancelation
Use Cases
BitTicket
The Edinburgh-based Citizen Ticket is an event ticketing platform backed by blockchain technology that uses the cryptocurrency Ethereum Classic. In May 2017, they deployed the blockchain-based ticketing system BitTicket and delivered the first live event using blockchain technology.
BitTicket is a ticket delivery service that event organisers, venues, and artists can use to secure their tickets with blockchain technology. BitTicket provides users with one wallet QR code that holds all their BitTickets securely, no matter which ticketing provider they bought them from. They simply present it along with proof of ID to gain entry. Due to the security of BitTicket identity, ticket transfer to friends and family can be done easily and with assurance. BitTickets are immutable, transferable, and verifiable.
BitTicket guarantees the following:
Your purchased ticket is genuine
Inherent protection against industrial-scale ticket touts and ticket purchasing bots
Transfer your tickets securely and with ease between friends & family
Provides one wallet for all your tickets – no more individual tickets
GUTS
GUTS uses blockchain technology to create a transparent ticketing ecosystem where inflated secondary market prices and ticket fraud are eliminated. Their motto is simple, transparent and secure.
GUTS brings numerous benefits for different stakeholders:
Artist and Managers
A fair chance for all the fans to attend the show
Expand the fan base with exact data
Direct communication with your fans. Send them a message right before the show starts.
The venue, Festival and Theatre Operators
No ticket fraud: fewer complaints and a stronger image
You know exactly who is present, anytime (and who isn’t)
Automatic refund procedure at the time of cancelation or resale
Identification via mobile phones means a shorter queue
Ticket Providers
Complete control on the tickets at both the primary and secondary market
Easy to integrate with existing ticketing solutions
LAVA
LAVA is a blockchain-based ticketing system that guarantees fair and secure smart tickets for music lovers. The system could prevent ticket touting and fraud ruining festivals for music lovers.
The LAVA ecosystem has the following features:
100% Safe
Using latest blockchain technology to eliminate ticket fraud
Smart Tickets
Smart tickets to stop the exploitation of festival tickets using a unique digital footprint
Lava Wallet-Eliminate printing completely by generating the ticket digitally and sending the digital ticket to the Lava wallet directly.
No booking fee
PouchNATION
PouchNATION is an event management software system that uses the blockchain technology to good effect. PouchNATION is the first platform to implement blockchain and new digital currency across all verticals in event management. Its components comprise guest registration, cashless payment, access control, activity tracking, social engagement and detailed analytics reporting.
This innovative platform could overcome issues that the ticket industry is currently facing with managing events, attendance tracking apps, eliminating duplicate tickets, and validating registration at the door.
They have executed over 100 events including cashless events in Indonesia events in Indonesia, Philippines, Vietnam, Malaysia, Thailand, and Myanmar.
EventChain
EventChain is a global Smart Ticketing blockchain project that will allow events worldwide to sell SmartTickets through a peer-to-peer network, solving the issues of the centralized event ticketing industry.
It implements the EventChain token network for event management presents to ensure faster transactions, indisputable ticket vouchers, transparency from event hosts and fully flexible and programmable SmartTickets. With the use of the EVC token, smart contract code, and the Ethereum blockchain, EventChain’s transaction network brings increased accountability, transparency, and security to event ticketing.
To fix the excessive ticket fees, EventChain is distributing EVC tokens, a digital ERC20 token created for buying, selling, and programming SmartTickets on the Ethereum distributed network. EventChain claims that their transaction fees are much lower and the transaction confirmation speed is near seconds.
A Conceptualised Event Management and Ticketing Platform
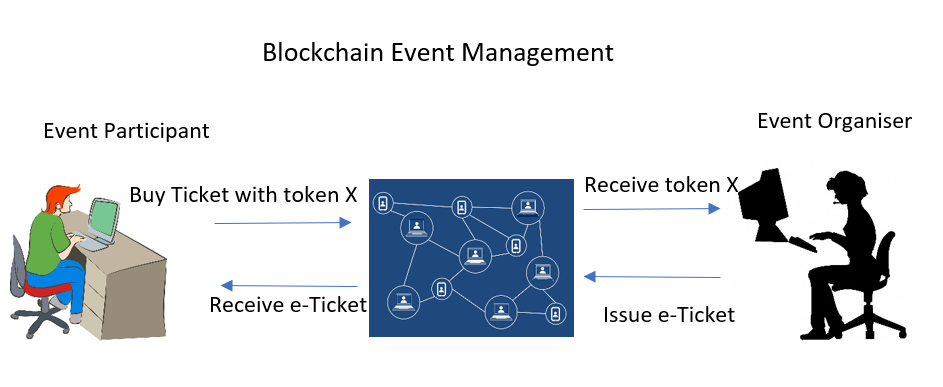
After examining the above use cases, I propose that we can use a similar concept to develop blockchain-based event management and ticketing system for a decentralized platform. Below is a simple conceptual model of Event Management and Ticketing platform:
The platform allows an event organizer to create an event and broadcast it to the website as well as the Token X wallet. The event should comprise details such as event title, date, time, venue, and a ticketing ordering button. The participant can then order tickets by paying Token X. Once the organizer receives Token X, the e-ticket shall be automatically delivered to the participant’s mobile wallet. To enter the event venue, the organizer just needs to scan the e-ticket of the participant.
To build the platform, we need to build a smart contract layer on top of the platform to automate the buying and selling of event tickets. We shall use Solidity to write the contracts. There shall be at least two smart contracts – the event contract, and the ticket contract. The event contract will need to link to the ticket contract as it needs to use the data in the ticket contract. The keyword to access the data in another contract is import. For example, we can create an event contract event.sol that imports the ticket contract ticket.sol, using the syntax as follows:
Pragma Solidity ^0.5.0
import "./ticket.sol";
The event.sol file shall create an event contract that specifies event details such as total tickets, collected funds, start time, etc. The code could be as follows:
DApp is an abbreviation for decentralized application.
A DApp has its backend code running on a decentralized peer-to-peer network. Contrast this with an app where the backend code is running on centralized servers.
A DApp can have frontend code and user interfaces written in any language that can make calls to its backend. Furthermore, its frontend can be hosted on decentralized storage such as Swarm or IPFS.
Ganache is a personal blockchain for Ethereum development you can use to deploy contracts, develop your applications, and run tests. It is available as both a desktop application as well as a command-line tool (formerly known as the TestRPC). Ganache is available for Windows, Mac, and Linux.
Truffle is a world-class development environment, testing framework and asset pipeline for blockchains using the Ethereum Virtual Machine (EVM), aiming to make life as a developer easier.
The KittyChain DApp is an adoption tracking system for a pet shop
Steps to build the Dapp
Setting up the development environment
Creating a Truffle project using a Truffle Box
Writing the smart contract
Compiling and migrating the smart contract
Testing the smart contract
Creating a user interface to interact with the smart contract
Having installed the aforementioned packages, we shall proceed to install Ganache. You can download Ganache by navigating tohttp://truffleframework.com/ganacheand clicking the “Download” button.
Step 2 Creating a Truffle project using a Truffle Box
Truffle initializes in the current directory, so first create a directory in your development folder of choice and then move inside it.
mkdir pet-shop-tutorial

cd pet-shop-tutorial
Now you have created a Truffle Box called pet-shop, which includes the basic project structure as well as code for the user interface.
Next, use the truffle unbox command to unpack this Truffle Box.
truffle unbox pet-shop
The Output
Directory structure
The default Truffle directory structure contains the following folders and files:
contracts/: Contains the Solidity source files for our smart contracts. There is an important contract in here called Migrations.sol, which we’ll discuss later.
migrations/: Truffle uses a migration system to handle smart contract deployments. Migration is an additional special smart contract that keeps track of changes.
test/: Contains both JavaScript and Solidity tests for our smart contracts.
truffle.js: Truffle configuration file.
Step 3 Writing the smart contract
We’ll shall write the smart contract that will act as the back-end logic and storage.
Create a new file named Adoption.sol in the contracts/ directory. To save time, please download the file from:
pragma solidity ^0.4.24;
 contract Adoption {
    //array of 16 addresses, 20 bytes
    address[16] public adopters;
 // Adopting a pet
    function adopt(uint petId) public returns (uint) {
    require(petId >= 0 && petId <= 15);
 adopters[petId] = msg.sender;
   return petId;
    }
 // Retrieving the adopters
    function getAdopters() public view returns (address[16]) {
       return adopters;
    }
 }
Step 4 Compiling and migrating the smart contract
Now that we have the smart contract, we shall proceed to compile and migrate it.
Truffle has a built-in developer console known as Truffle Develop, which generates a development blockchain that we can use to test and deploy the smart contract. It also has the ability to run Truffle commands directly from the console.
We need to compile the smart contract written in Solidity to bytecode for the Ethereum Virtual Machine (EVM) to execute. Think of it as translating our human-readable Solidity into something the EVM understands. In a terminal, make sure you are in the root of the directory that contains the DApp and type:
truffle compile
The output
Compiling ./contracts/Migrations.sol...
Compiling ./contracts/Adoption.sol...
Writing artifacts to ./build/contracts
Now that we’ve successfully compiled our contracts, it’s time to migrate them to the blockchain! Migration is the deployment script meant to alter the state of the application’s contracts, moving it from one state to the next. For the first migration, you might just be deploying new code, but over time, other migrations might move data around or replace a contract with a new one.
By the way, there is one JavaScript file already in the migrations/ directory: 1_initial_migration.js. This file handles deploying the Migrations.sol contract to observe subsequent smart contract migrations, and ensures we don’t double-migrate unchanged contracts in the future. Now let’s create our own migration script.
Create a new file named 2_deploy_contracts.js in the migrations/directory.
To save time, download the file from the following link:
Before we can migrate our contract to the blockchain, we need to have a blockchain running. For this tutorial, we’re going to use Ganache, a personal blockchain for Ethereum development you can use to deploy contracts, develop applications, and run tests. If you haven’t already, download Ganache and double click the icon to launch the application. This will generate a blockchain running locally on port 7545.
Launch Ganache and you get the following output:
Now back in your VS Code terminal, enter the following command:
truffle migrate
You can see the migrations being executed in order, followed by the blockchain address of each deployed contract.
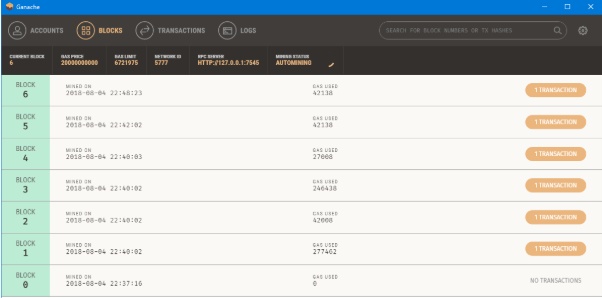
In Ganache, note that the state of the blockchain has changed. The blockchain now shows that the current block, previously 0, is now 4. In addition, while the first account originally had 100 ether, it is now lower at 99.94, due to the transaction costs of migration.
Step 5 Testing the smart contract
Truffle is very flexible when it comes to smart contract testing, in that tests can be written either in JavaScript or Solidity. In this tutorial, we’ll be writing our tests in Solidity.
Create a new file named TestAdoption.sol in the test/ directory. To save time, download a copy of the file from the following link:
Assert.sol: Gives us various assertions to use in our tests. In testing, an assertion checks for things like equality, inequality or emptiness to return a pass/fail from our test. Here’s a full list of the assertions included with Truffle.
DeployedAddresses.sol: When running tests, Truffle will deploy a fresh instance of the contract being tested to the blockchain. This smart contract gets the address of the deployed contract.
Adoption.sol: The smart contract we want to test.
To run the test, enter the following command
Truffle test
The output is as follows:
Step 6 Creating a user interface to interact with the smart contract
Now that we’ve created the smart contract, deployed it to our local test blockchain and confirmed we can interact with it via the console, it’s time to create a UI so that the user can interact with the pet shop!
Included with the pet-shop Truffle Box is the code for the app’s frontend. It is the JavaScript file app.js within the src/ directory. You can download the app.js file from the following link:
We need to instantiate web3 to create the UI. The global App object is to manage our application, load in the pets data in init() and then call the function initWeb3(). The web3 JavaScript libraryinteracts with the Ethereum blockchain. It can retrieve user accounts, send transactions, interact with smart contracts, and more.
First, we check if there’s a web3 instance already active. (Ethereum browsers like Mist or Chrome with the MetaMask extension will inject their own web3 instances.) If an injected web3 instance is present, we get its provider and use it to create our web3 object.
If no injected web3 instance is present, we create our web3 object based on our local provider. (Here we fallback on http://localhost:7545 that points to Ganache.)
Instantiating the contract
We need to instantiate our smart contract so web3 knows where to find it and how it works. Truffle has a library to help with this called truffle-contract. It keeps information about the contract in sync with migrations, so you don’t need to change the contract’s deployed address manually.
First, we retrieve the artifact file for our smart contract. Artifacts are information about our contract such as its deployed address and Application Binary Interface (ABI). The ABI is a JavaScript object defining how to interact with the contract including its variables, functions and parameters.
Once we have the artifacts in our callback, we pass them to TruffleContract(). This creates an instance of the contract we can interact with. With our contract instantiated, we set its web3 provider using the App.web3Provider value we stored earlier when setting up web3.
We then call the app’s markAdopted() function in case any pets are already adopted from a previous visit. We’ve encapsulated this in a separate function since we’ll need to update the UI any time we make a change to the smart contract data.
Getting The Adopted Pets and Updating The UI
We shall access the deployed Adoption contract, then call getAdopters() on that instance.
We first declare the variable adoptionInstance outside of the smart contract calls so we can access the instance after initially retrieving it.
Using call() allows us to read data from the blockchain without having to send a full transaction, meaning we won’t have to spend any ether.
After calling getAdopters(), we then loop through all of them, checking to see if an address is stored for each pet. Since the array contains address types, Ethereum initializes the array with 16 empty addresses. This is why we check for an empty address string rather than null or other false value.
Once a petId with a corresponding address is found, we disable its adopt button and change the button text to “Success“, so the user gets some feedback. Any errors are logged to the console.
Handling the adopt() Function
We use web3 to get the user’s accounts. In the callback after an error check, we select the first account.
From there, we get the deployed contract as we did above and store the instance in adoptionInstance. This time though, we’re going to send a transaction instead of a call. Transactions require a “from” address and have an associated cost. This cost, paid in ether, is called gas. The gas cost is the fee for performing computation and/or storing data in a smart contract. We send the transaction by executing the adopt() function with both the pet’s ID and an object containing the account address, which we stored earlier in account.
The result of sending a transaction is the transaction object. If there are no errors, we proceed to call our markAdopted() function to sync the UI with our newly stored data.
Step 7 Interacting with the DApp in a browser
The easiest way to interact with our DApp in a browser is through MetaMask, a browser extension for both Chrome and Firefox.
Install MetaMask in your browser.
Once installed, you’ll see the MetaMask fox icon next to your address bar. Click the icon and you’ll see this screen appear:
At the initial MetaMask screen, click Import Existing DEN.
In the box marked Wallet Seed, enter the mnemonic that is displayed in Ganache.
Enter a password below that and click OK.
Now we need to connect MetaMask to the blockchain created by Ganache. Click the menu that shows “Main Network” and select Custom RPC.
In the box titled “New RPC URL” enter http://127.0.0.1:7545 and click Save.
The network name at the top will switch to say “Private Network”.
Each account created by Ganache is given 100 ether. You’ll notice it’s slightly less on the first account because some gas was used when the contract itself was deployed and when the tests were run. (Make sure you are running Ganache as well.)
Installing and configuring lite-server
We can now start a local web server and use the DApp. We’re using thelite-server library to serve our static files. This shipped with the pet-shop Truffle Box, but let’s take a look at how it works.
This tells lite-server which files to include in our base directory. We add the ./src directory for our website files and ./build/contracts directory for the contract artifacts.
I added “browser”: [“chrome”]
So that the UI opens in the Chrome browser.
We’ve also added a dev command to the scripts object in the package.json file in the project’s root directory. The scripts object allows us to alias console commands to a single npm command.
To launch the app, enter the command in the VS Code Console.
You can develop your very own cryptocurrency using your laptop that runs Windows operating system. This article a step by step guide for newbies to easily developing and deploying a token using the sample code provided by the Truffle framework. Truflle is a world-class development environment, testing framework and asset pipeline for blockchains using the Ethereum Virtual Machine (EVM).
This is a step-by-step guide for developing an Ethereum-based cryptocurrency on Windows.
To start the project, we need to set up a development environment with the following requirements:
A code editor
Source control
Unit tests
Debugging
For code editor, we use Visual Studio code for the following reasons:
VS Code integrates very well with Git for source control. Git is currently the best choice for source control.
VS Code works well with Truffle framework that manages unit tests.
VS Code works well with Truffle for debugging
Besides that, Visual Studio code is a great tool for editing Solidity smart contracts and is available on Windows, Mac & Linux.
I. Installation of the Packages
Step1: Install Chocolatey
Launch PowerShell as administrator. In PowerShell, enter the following command:
Set-ExecutionPolicy Bypass
*The Set-ExecutionPolicy changes the user preference for the Windows PowerShell execution policy.*Bypass-Nothing is blocked and there are no warnings or prompts. This execution policy is designed for configurations in which a Windows PowerShell script is built in to a a larger application or for configurations in which Windows PowerShell is the foundation for a program that has its own security model. * Why Chocolatey-“You’ve never deployed software faster than you will with Chocolatey.” -Rob Reynolds. Chocolatey is a software management automation.
Install Chocolatey by entering the following code:
*https://chocolatey.org/docs/installation *iex-invoke expression-The Invoke-Expression cmdlet evaluates or runs a specified string as a command and returns the results of the expression or command. Without Invoke-Expression, a string submitted at the command line would be returned (echoed) unchanged.
*A cmdlet (pronounced “command-let”) is a lightweight Windows PowerShell script that performs a single function.
* https://chocolatey.org/install.ps1 downloads the Chocolatey installation zip file, unzips it and continues the installation by running a scripts in the tools section of the package.
After installation completed, close and reopen PowerShell as administrator again.
Step 2 Install Visual Studio Code, Git and Node.js
*As an asynchronous event driven JavaScript runtime, Node is designed to build scalable network applications. In programming, asynchronous events are those occurring independently of the main program flow. Asynchronous actions are actions executed in a non-blocking scheme, allowing the main program flow to continue processing
Close and reopen PowerShell before proceeding to the next step
Step 3 Install Truffle Framework
Truffle is a world class development environment, testing framework and asset pipeline for Ethereum, aiming to make life as an Ethereum developer easier
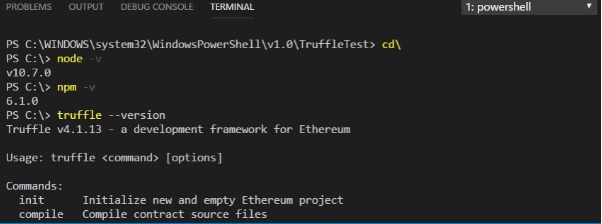
You can check the version of installed packages with the following code:
node -v
npm -v
truffle --version
The output is as shown in Figure 1.
Figure 1
II. Configuring VS Code for Ethereum Blockchain Development
Step 1 Choose the folder for your project
Choose a folder you prefer for your project and enter the following code:
mkdir TruffleTest; cd TruffleTest; code .
The final command in the chain is “Code .”, which opens an instance of Visual Studio Code in the folder from which the command is executed.
Step 2 Install Solidity in the VS Code IDE
In the VS Code IDE, search for Solidity and install it
Step 3 Install Material Icon Theme
In the VS Code , install Material Icon Theme
Now you have the VS integrated with PowerShell IDE for Ethereum Blockchain development.
III. Creating a Blockchain Application
We will create a sample cryptocurrency and a smart contract using the built-in sample MetaCoin in Truffle. Now, download the files that can be compiled and deployed to a simulated blockchain using Truffle.
The code is
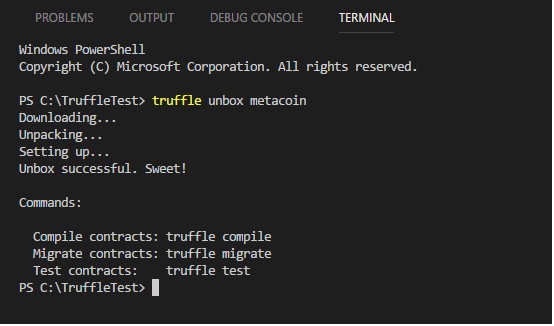
truffle unbox metacoin
The output should looks as shown in Figure 2.
Figure 2
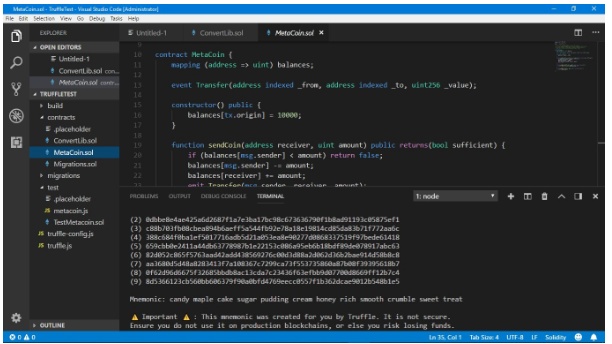
After downloading Truffle metacoin, we should be able to view two important application files written in Solidity, MetaCoin.sol and ConvertLib.sol, in Figure 3.
* Solidity is a contract-oriented, high-level language for implementing smart contracts. It was influenced by C++, Python and JavaScript and is designed to target the Ethereum Virtual Machine (EVM).
*the Ethereum Virtual Machine is designed to serve as a runtime environment for smart contracts based on Ethereum.
Figure 3
These two files can be compiled and deployed to a simulated blockchain using Truffle.
To compile the smart contract, using the following command
truffle compile
*Or use truffle.cmd compile if there is error as shown in Figure 4.
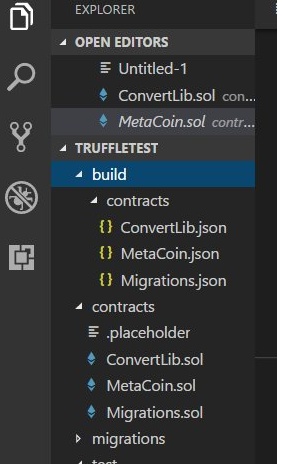
After compilation completed, You will notice that a ‘build’ folder has been added to the list of files, which contains the compiled json files ConvertLib.json, MetaCoin.json, and Migrations.json, as shown in Figure 5.
Figure 5
IV Deploying the Contract
To deploy the contract, we shall migrate the contract to a test network in truffle development environment.
The ‘develop’ command appears in the Truffle development console environment. This will set up a kind of dummy blockchain, that operates similarly to the real Ethereum blockchain, and allows us to test deployment and execution of the code without needing to interface with an actual blockchain.
To compile the contract, key in the following command
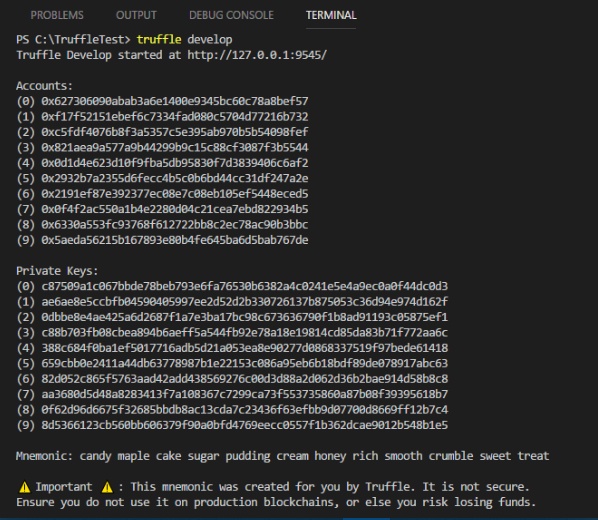
truffle develop
This command will launch the truffle development environment, automatically configured with 10 accounts and keys. The output is as shown in Figure 6.
Figure 6
To deploy the compiled contract to the Truffle environment, enter the following command:
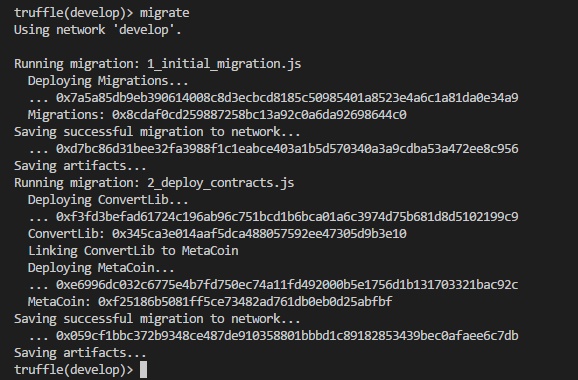
migrate
This will deploy the contracts to the test environment. The output is as shown in Figure 7.
Figure 7
To test the contract, enter the following command
test
You will see the output as shown in Figure 8.
Figure 8
To exit the Truffle console, type ctrl+D
To reenter the Truffle console, enter the following code
truffle develop
migrate --reset
test
V Interacting with the contract with Web3
We have deployed and test the contract, now let’s do something with the contract. We will need to use the Web3 framework to interact with the smart contract on the Ethereum blockchain. Web3 is a JavaScript library which is bundled into the Truffle development console.
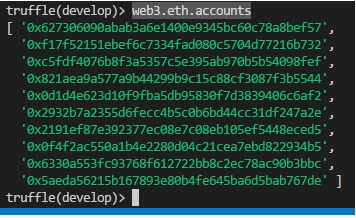
When the Truffle development console is started, it automatically configures 10 addresses, and assigns each of the addresses 100 Eth. You can check the ten available addresses by entering the following code:
web3.eth.accounts
The output is as shown in Figure 9.
Figure 9
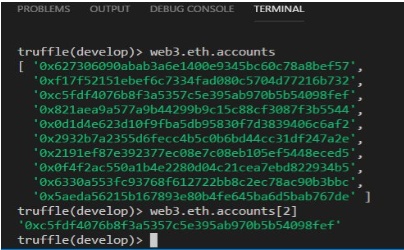
You can display individual account using the following syntax
web3.eth.accounts[n]
For example, enter the following code to see the output
web3.eth.accounts[2]
The output is as shown in Figure 10.
Figure 10
Functions in the MetaCoin.sol file
There are four functions in the MetaCoin.sol file, as follows:
MetaCoin, the constructor. It is called when the contract is deployed.
sendCoin, for transferring coins between addresses.
getBalanceInEth, to convert between MetaCoins, and Ethereum.
getBalance, to show the balance in the requested address.
* A constructor is a special method of a class or structure in object-oriented programming that initializes an object of that type. A constructor is an instance method that usually has the same name as the class, and can be used to set the values of the members of an object, either to default or to user-defined values.
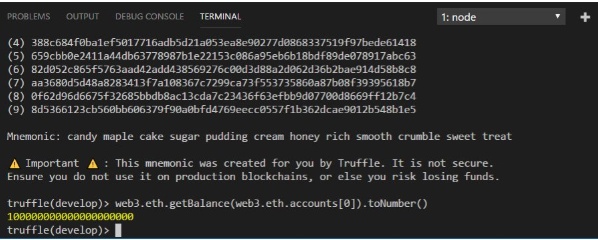
The constructor MetaCoin comprises only one line
balances[tx.origin] = 10000;
*You can change this to any amount
This code initialises the transaction to 10000 MetaCoin(Not Eth)
The initial address is
Web3.eth.accounts[0]
Checking Balance using the getBalance() method
You can check the balance of any account using the following code
The check whether the transaction is successful , we can check the balance of both accounts. (Note that this is the MetaCoin balance, NOT the Eth balance)
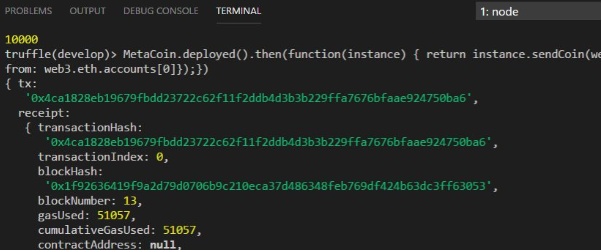
In the sendCoin() example, a transaction has occurred on the blockchain. This transaction can be stepped through line by line, using the Truffle debugger. To do this , the Truffle debug command is used, passing in the transaction hash. This hash can be found in the console output following the sendCoin function call.
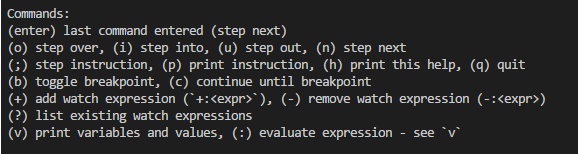
This will start the Truffle debugger. The instructions for interacting with the debugger are printed to the console, as shown in Figure 17.
Figure 17
You should start by adding a watch to the passed variables. do this by entering the following command:
+: receiver
+: amount
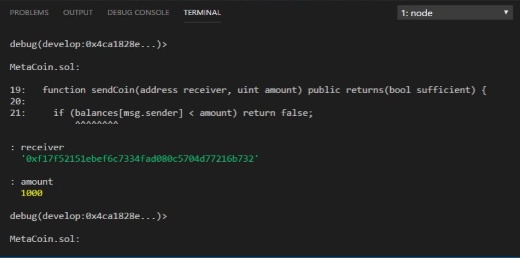
As you step through the code, the values passed into the function will be shown. Note, these are ‘undefined’ at the start of the function call.
You can press the enter key a few times to step through the code that was executed in this transaction. The output is as shown in Figure 18.
Figure 18
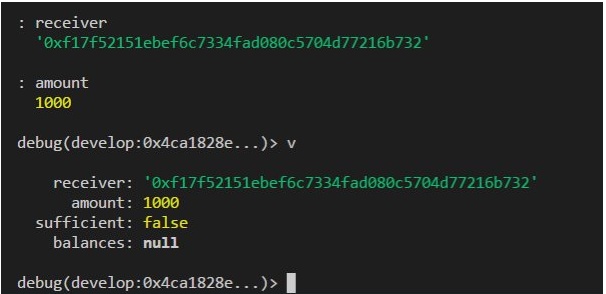
The debug commands can be used to inspect the variables, and add watched variables, as shown in Figure 19.
Figure 19
You can try to enter other commands.
Lastly, type quit to quit debugger
Deploying Your MetaCoin Contract with Truffle
Deploy to Ganache
Ganache is your personal Ethereum blockchain which is convenient for testing and interacting with your contracts during development. It ships with a helpful GUI that allows you to see available test accounts quickly, explore transactions, read logs, and see how much gas was consumed. Configure your truffle.js and truffle.config.js for the Ganache network:
module.exports = {
  networks: {
    ganache: {
      host: "127.0.0.1",
      port: 7545,
      network_id: "*" // matching any id
    }
  }
};
Launch Ganache
In the Truffle console, enter the following command:
truffle migrate --network ganache
The output is as shown in Figure 20.
Figure 20
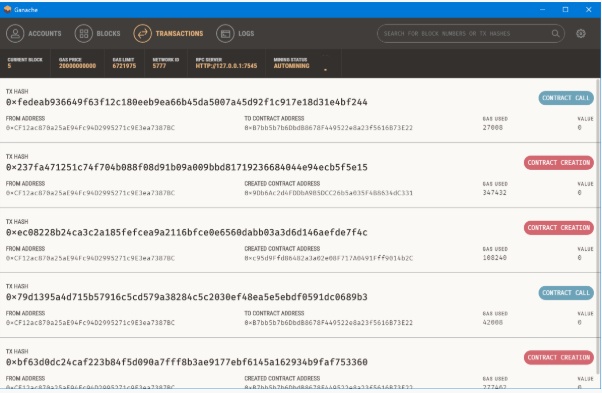
Ganache output is as shown in Figure 21.
Figure 21
Click transaction and compare the transaction hash. They are the same.
Figure 22
Deploy to Ropsten
Run a node connected to Ropsten and specify the address of the default (first) account to unlock. You will be prompted for a passphrase.