What is DApp?
DApp is an abbreviation for decentralized application.
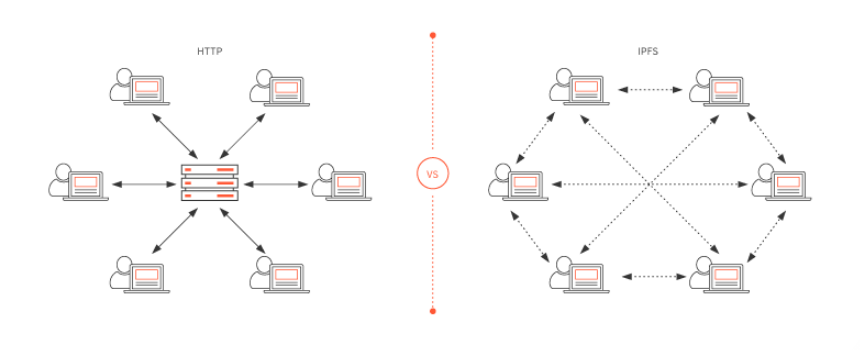
A DApp has its backend code running on a decentralized peer-to-peer network. Contrast this with an app where the backend code is running on centralized servers.
A DApp can have frontend code and user interfaces written in any language that can make calls to its backend. Furthermore, its frontend can be hosted on decentralized storage such as Swarm or IPFS.
The Project Description
In this project, we shall use Ganache (https://truffleframework.com/ganache) to develop the KittyChain Shop DApp.
Ganache is a personal blockchain for Ethereum development you can use to deploy contracts, develop your applications, and run tests. It is available as both a desktop application as well as a command-line tool (formerly known as the TestRPC). Ganache is available for Windows, Mac, and Linux.
Truffle is a world-class development environment, testing framework and asset pipeline for blockchains using the Ethereum Virtual Machine (EVM), aiming to make life as a developer easier.
The KittyChain DApp is an adoption tracking system for a pet shop
Steps to build the Dapp
- Setting up the development environment
- Creating a Truffle project using a Truffle Box
- Writing the smart contract
- Compiling and migrating the smart contract
- Testing the smart contract
- Creating a user interface to interact with the smart contract
- Interacting with the dApp in a browser
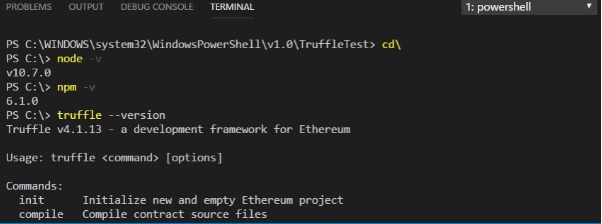
Step 1 Setting up the development environment
Install the following:
Having installed the aforementioned packages, we shall proceed to install Ganache. You can download Ganache by navigating to http://truffleframework.com/ganache and clicking the “Download” button.
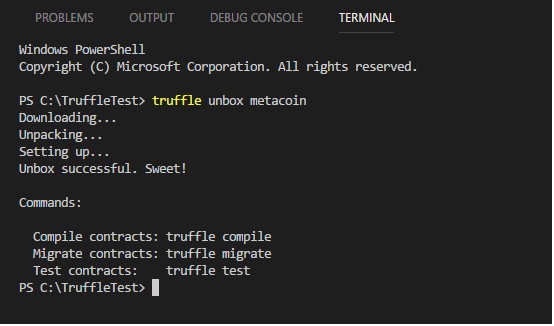
Step 2 Creating a Truffle project using a Truffle Box
Truffle initializes in the current directory, so first create a directory in your development folder of choice and then move inside it.
mkdir pet-shop-tutorial

cd pet-shop-tutorial
Now you have created a Truffle Box called pet-shop, which includes the basic project structure as well as code for the user interface.
Next, use the truffle unbox command to unpack this Truffle Box.
truffle unbox pet-shop
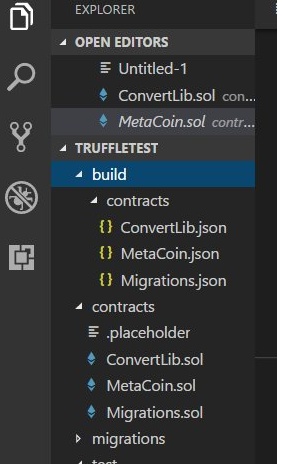
The Output

Directory structure
The default Truffle directory structure contains the following folders and files:
- contracts/: Contains the Solidity source files for our smart contracts. There is an important contract in here called Migrations.sol, which we’ll discuss later.
- migrations/: Truffle uses a migration system to handle smart contract deployments. Migration is an additional special smart contract that keeps track of changes.
- test/: Contains both JavaScript and Solidity tests for our smart contracts.
- truffle.js: Truffle configuration file.
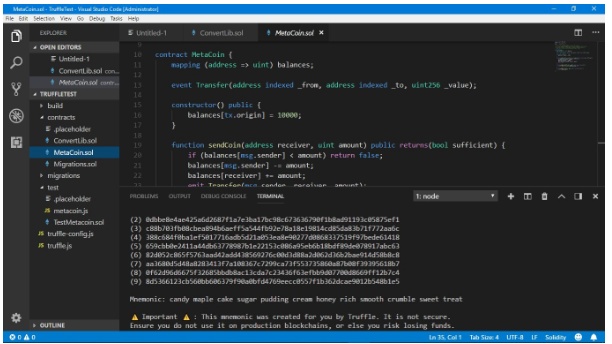
Step 3 Writing the smart contract
We’ll shall write the smart contract that will act as the back-end logic and storage.
Create a new file named Adoption.sol in the contracts/ directory. To save time, please download the file from:
http://javascript-tutor.net/blockchain/download/contracts/Adoption.sol
Adoption.sol
pragma solidity ^0.4.24;
 contract Adoption {
    //array of 16 addresses, 20 bytes
    address[16] public adopters;
 // Adopting a pet
    function adopt(uint petId) public returns (uint) {
    require(petId >= 0 && petId <= 15);
 adopters[petId] = msg.sender;
   return petId;
    }
 // Retrieving the adopters
    function getAdopters() public view returns (address[16]) {
       return adopters;
    }
 }
Step 4 Compiling and migrating the smart contract
Now that we have the smart contract, we shall proceed to compile and migrate it.
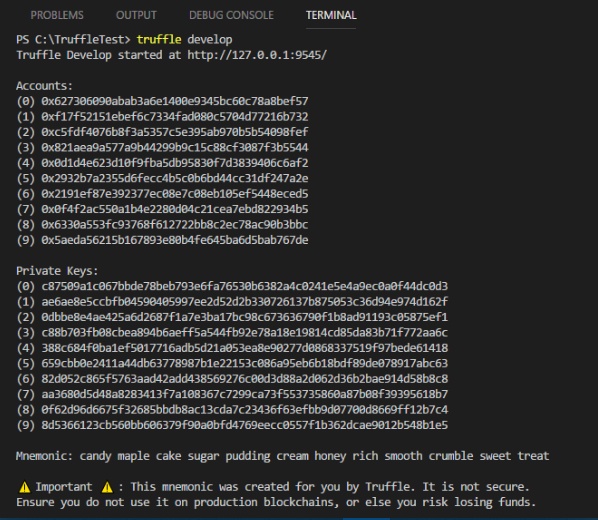
Truffle has a built-in developer console known as Truffle Develop, which generates a development blockchain that we can use to test and deploy the smart contract. It also has the ability to run Truffle commands directly from the console.
We need to compile the smart contract written in Solidity to bytecode for the Ethereum Virtual Machine (EVM) to execute. Think of it as translating our human-readable Solidity into something the EVM understands. In a terminal, make sure you are in the root of the directory that contains the DApp and type:
truffle compile
The output
Compiling ./contracts/Migrations.sol...
Compiling ./contracts/Adoption.sol...
Writing artifacts to ./build/contracts
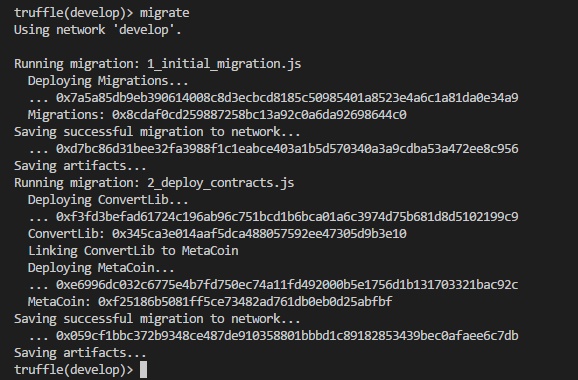
Now that we’ve successfully compiled our contracts, it’s time to migrate them to the blockchain! Migration is the deployment script meant to alter the state of the application’s contracts, moving it from one state to the next. For the first migration, you might just be deploying new code, but over time, other migrations might move data around or replace a contract with a new one.
By the way, there is one JavaScript file already in the migrations/ directory: 1_initial_migration.js. This file handles deploying the Migrations.sol contract to observe subsequent smart contract migrations, and ensures we don’t double-migrate unchanged contracts in the future. Now let’s create our own migration script.
Create a new file named 2_deploy_contracts.js in the migrations/directory.
To save time, download the file from the following link:
http://javascript-tutor.net/blockchain/download/contracts/2_deploy_contracts.js
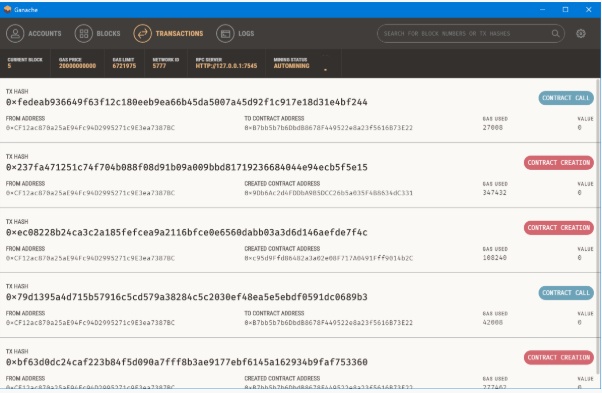
Before we can migrate our contract to the blockchain, we need to have a blockchain running. For this tutorial, we’re going to use Ganache, a personal blockchain for Ethereum development you can use to deploy contracts, develop applications, and run tests. If you haven’t already, download Ganache and double click the icon to launch the application. This will generate a blockchain running locally on port 7545.
Launch Ganache and you get the following output:

Now back in your VS Code terminal, enter the following command:
truffle migrate

You can see the migrations being executed in order, followed by the blockchain address of each deployed contract.
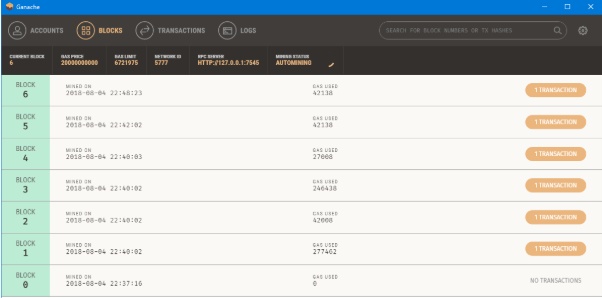
In Ganache, note that the state of the blockchain has changed. The blockchain now shows that the current block, previously 0, is now 4. In addition, while the first account originally had 100 ether, it is now lower at 99.94, due to the transaction costs of migration.

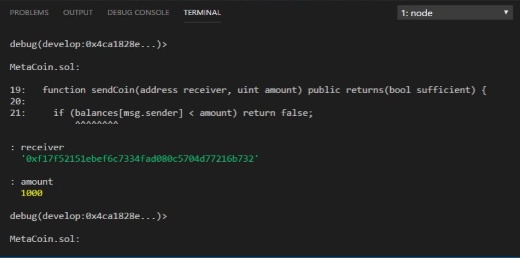
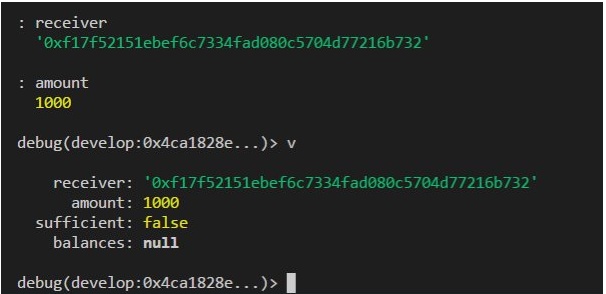
Step 5 Testing the smart contract
Truffle is very flexible when it comes to smart contract testing, in that tests can be written either in JavaScript or Solidity. In this tutorial, we’ll be writing our tests in Solidity.
Create a new file named TestAdoption.sol in the test/ directory. To save time, download a copy of the file from the following link:
http://javascript-tutor.net/blockchain/download/test/TestAdoption.sol
We start the contract off with 3 imports:
- Assert.sol: Gives us various assertions to use in our tests. In testing, an assertion checks for things like equality, inequality or emptiness to return a pass/fail from our test. Here’s a full list of the assertions included with Truffle.
- DeployedAddresses.sol: When running tests, Truffle will deploy a fresh instance of the contract being tested to the blockchain. This smart contract gets the address of the deployed contract.
- Adoption.sol: The smart contract we want to test.
To run the test, enter the following command
Truffle test
The output is as follows:

Step 6 Creating a user interface to interact with the smart contract
Now that we’ve created the smart contract, deployed it to our local test blockchain and confirmed we can interact with it via the console, it’s time to create a UI so that the user can interact with the pet shop!
Included with the pet-shop Truffle Box is the code for the app’s frontend. It is the JavaScript file app.js within the src/ directory. You can download the app.js file from the following link:
http://javascript-tutor.net/blockchain/download/src/js/app.js
We need to instantiate web3 to create the UI. The global App object is to manage our application, load in the pets data in init() and then call the function initWeb3(). The web3 JavaScript library interacts with the Ethereum blockchain. It can retrieve user accounts, send transactions, interact with smart contracts, and more.
First, we check if there’s a web3 instance already active. (Ethereum browsers like Mist or Chrome with the MetaMask extension will inject their own web3 instances.) If an injected web3 instance is present, we get its provider and use it to create our web3 object.
If no injected web3 instance is present, we create our web3 object based on our local provider. (Here we fallback on http://localhost:7545 that points to Ganache.)
Instantiating the contract
We need to instantiate our smart contract so web3 knows where to find it and how it works. Truffle has a library to help with this called truffle-contract. It keeps information about the contract in sync with migrations, so you don’t need to change the contract’s deployed address manually.
First, we retrieve the artifact file for our smart contract. Artifacts are information about our contract such as its deployed address and Application Binary Interface (ABI). The ABI is a JavaScript object defining how to interact with the contract including its variables, functions and parameters.
Once we have the artifacts in our callback, we pass them to TruffleContract(). This creates an instance of the contract we can interact with. With our contract instantiated, we set its web3 provider using the App.web3Provider value we stored earlier when setting up web3.
We then call the app’s markAdopted() function in case any pets are already adopted from a previous visit. We’ve encapsulated this in a separate function since we’ll need to update the UI any time we make a change to the smart contract data.
Getting The Adopted Pets and Updating The UI
We shall access the deployed Adoption contract, then call getAdopters() on that instance.
We first declare the variable adoptionInstance outside of the smart contract calls so we can access the instance after initially retrieving it.
Using call() allows us to read data from the blockchain without having to send a full transaction, meaning we won’t have to spend any ether.
After calling getAdopters(), we then loop through all of them, checking to see if an address is stored for each pet. Since the array contains address types, Ethereum initializes the array with 16 empty addresses. This is why we check for an empty address string rather than null or other false value.
Once a petId with a corresponding address is found, we disable its adopt button and change the button text to “Success“, so the user gets some feedback. Any errors are logged to the console.
Handling the adopt() Function
We use web3 to get the user’s accounts. In the callback after an error check, we select the first account.
From there, we get the deployed contract as we did above and store the instance in adoptionInstance. This time though, we’re going to send a transaction instead of a call. Transactions require a “from” address and have an associated cost. This cost, paid in ether, is called gas. The gas cost is the fee for performing computation and/or storing data in a smart contract. We send the transaction by executing the adopt() function with both the pet’s ID and an object containing the account address, which we stored earlier in account.
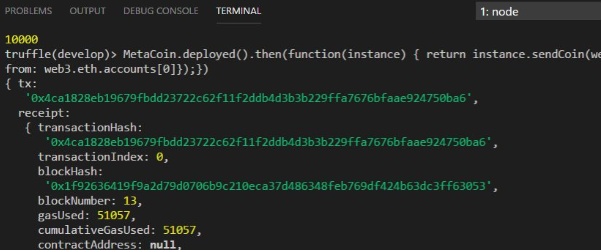
The result of sending a transaction is the transaction object. If there are no errors, we proceed to call our markAdopted() function to sync the UI with our newly stored data.
Step 7 Interacting with the DApp in a browser
The easiest way to interact with our DApp in a browser is through MetaMask, a browser extension for both Chrome and Firefox.
Install MetaMask in your browser.
Once installed, you’ll see the MetaMask fox icon next to your address bar. Click the icon and you’ll see this screen appear:
At the initial MetaMask screen, click Import Existing DEN.
In the box marked Wallet Seed, enter the mnemonic that is displayed in Ganache.

Enter a password below that and click OK.
Now we need to connect MetaMask to the blockchain created by Ganache. Click the menu that shows “Main Network” and select Custom RPC.

In the box titled “New RPC URL” enter http://127.0.0.1:7545 and click Save.
The network name at the top will switch to say “Private Network”.
Each account created by Ganache is given 100 ether. You’ll notice it’s slightly less on the first account because some gas was used when the contract itself was deployed and when the tests were run. (Make sure you are running Ganache as well.)

Installing and configuring lite-server
We can now start a local web server and use the DApp. We’re using the lite-server library to serve our static files. This shipped with the pet-shop Truffle Box, but let’s take a look at how it works.
Let’s examine bs-config.json
{
 "port": 3000,
  "server": {
 "baseDir": ["./src", "./build/contracts"],
 "open": false
  },
 "browser": ["chrome"]
 }
This tells lite-server which files to include in our base directory. We add the ./src directory for our website files and ./build/contracts directory for the contract artifacts.
I added “browser”: [“chrome”]
So that the UI opens in the Chrome browser.
We’ve also added a dev command to the scripts object in the package.json file in the project’s root directory. The scripts object allows us to alias console commands to a single npm command.
To launch the app, enter the command in the VS Code Console.
npm run dev

Pet Shop UI

Metamask appears after clicking adopt.

Transactions are shown on Metamask.
And also on Ganache.

References