In the previous article, I have introduced the concept of tips selection using unweighted random walk (URW) algorithm. However, URW has its weakness that could crash the IOTA ecosystem. Fortunately, there is a better tips selection method known as the weighted random walk(WRW). In this article, I shall introduce the concept of WRW with the help of some illustrations.
The Lazy Tips
The main issue of using the URW algorithm is the occurrence of lazy tips. Lazy tips are tips that choose to approve some old transactions rather than actively looking to approve new transactions. We label them lazy tips because they could not be bothered to update the latest state of the IOTA Tangle network.Instead, they choose to broadcast its transactions based on old data. Let’s examine the following diagram.
With reference to the diagram above, transaction 17 and transaction 18 are lazy tips as they only approved some old transactions, as shown clearly in the diagram. If we employ the unweighted random walk selection method, these two tips have equal chances to get approved as other tips. Their behaviors would not even be penalized by the IOTA system. If there are too many lazy tips exist in the system, the Tangle will become stagnated or simply failed, as illustrated in the diagram below.
In the diagram above, we notice that the transactions 30 to 38 chose to approve very old transactions, leaving transactions 25 to 29 unapproved, or became orphans. In such situation, the Tangle structure will just stop propagating and eventually crumbles.
Weighted Random Walk
How should we overcome the ‘Lazy Tips’ phenomenon? We might impose a rule that requires all incoming transactions to approve the recent transactions. However, this coercive way is against the principles of decentralization and democracy, the core essence of decentralized ledger technologies. Therefore, IOTA opted for the persuasion method. It implements a built-in incentives system that rewards the participants to approve the recent transactions. The method is called the weighted random walk(WRW).
Weighted random walk uses the bias strategy to select the path towards a particular tip. The bias strategy involves choosing a path that has the highest approved transactions over the path that has very few approved transactions. Here we introduce a term called cumulative weight to denote the number of approvers of the transactions. It means that the higher the number of approvers, the higher the cumulative weight and vice versa. The approvers could both be direct or indirect approvers. Let’s examine the following diagram.
In order to approve tip number 13, the walker needs to walk to transaction number 5. However, transaction 5 only has a cumulative weight of 1, therefore the walker will not continue on this path. Instead, it will look for the path that has the highest cumulative weight. In our example, transaction 3 has a weight of 6, therefore the walker will choose this path and eventually reach transaction 14 and approve it.
The Parameter Alpha
However, even the weighted random walk method has its own weakness. If we insist that every approval of the transactions must follow the rule strictly, we will do away with randomness completely and many tips will be left unapproved. The Tangle system will end up having many unapproved transactions, or orphans. *I introduced my own word orphan which may not be accurate in accordance with the IOTA white paper. You can read the IOTA white paper here.
To overcome the issues, IOTA introduced a parameter α to control the ‘weight’ of the weighted random walk. If α =0, it becomes unweighted random walk and creates the issue of approving too many lazy tips. On the other hand, if we set the value of α too high, it will end up as a super weighted random walk which will leave many orphans in the Tangle.
Therefore, it is important to find a good balance between approving too many lazy tips and not leaving too many orphaned tips behind. To sum up, finding an ideal value for α is important to maintain the coherence of the Tangle ecosystem championed by IOTA.
We have learned about the basic concepts of Tangle in the previous article. Now. let’s examine how tips are selected. We shall also discuss transaction rates and the concept of random walk.
In IOTA tangle, transactions do not occur uniformly but rather randomly. At a certain period, there may be m transactions while in another period there may be only n transactions, where m>n or m<n. The transaction rate can be determined by a mathematical process known as Poisson Point Process. The Poisson Point Process model is used to analyze random events, such as the arrival of customers at a store, phone calls at a call center or occurrence of earthquakes, distributed in time
The transaction rate may be calculated based on the simplified Poisson Point Process formula as follows:
N=λt
Where N is the number of transactions and t is the time unit. λ is a constant. For example, if we set λ =5, and time unit =10 (the unit could be in milliseconds or seconds etc), the number of transactions occurring in a 10-unit time interval is 5×10=50.
Setting a suitable value of λ is crucial to maintaining the coherence of the Tangle structure. if we set the value of λ to be very small, let’s say 0.1 and the number of transactions remains at 50, the time interval will be 50 ÷ 0.1=500. In this case, it means that transactions will come in so slowly that it will form a chain instead of a Tangle, such that only one single tip could be approved at any given time, instead of approving two previous transactions. The scenario is illustrated in the diagram below:
On the other hand, what will happen if we set the value of λ too high? For example, if λ =10000 and N=50, the time interval t is 0.0005. It means that transactions will be occurring so fast that the only tip they can view is the genesis node, as illustrated in the diagram below:
In both cases, the Tangle structure will crumble.
Unweighted Random walk Algorithm
The tips selection algorithm we have discussed so far is a random selection process. This kind of selection process might not be suitable for the real use case. Therefore, we need to choose a more advanced tip selection algorithms. One of the algorithms is known as the unweighted random walk.
What is it? In programming, a walker is a variable used to move through an array or other data structure, often heading towards a fixed value and stepping through elements in an array. In Tangle, we can program a walker on the genesis transaction, and make it walks towards the tips.
On each step, it walks to one of the transactions which directly approves the one we are currently on. It chooses which transaction to walk to with equal probability, therefore it is called unweighted random walk. You can visualise the process from the animated diagram below:
Please watch the video below to understand more about the Tangle system.
From the connected mobile devices, wearable devices to Smart homes, the Internet of Things is beginning to permeate every aspect of our lives. The adoption of IoT technologies is fostering a new economy nurtured by these technologies. As this kind of economy is powered by the machine to machine (M2M) communication, it is also known as the machine economy.
According to IOTA foundation, the number of connected devices is estimated to reach 75 billion by 2025. Internet of Things (IoT) includes tiny sensors on roads, bridges, railway tracks, mobile phones, smart washing machines , smart drones, wearable electronics like smartwatches and more. The amount of data being produced and consumed by all these devices is becoming astronomical.
Over the next five years, it is predicted that the global IP traffic on the IoT network will increase five-fold by 2021, monthly IP traffic is expected to reach 31 Gigabytes per capita. However, for the same period, broadband speeds are expected only to double and the global data pipelines will experience congestion. By then, it will not be possible for all these devices to stay connected 24/7 to the centralized cloud silos for all the data they will generate.
Recently, the emergence ‘Fog’ and ‘Mist’ computing emerged might provide a solution to the aforementioned issue. However, how to distribute resources efficiently across the IoT ecosystem remains a huge challenge in this new Machine Economy. Therefore, IOTA was conceptualized with the mission to tackle the congestion issue. By implementing zero fee transactions, these devices can share the technological resources in real-time locally in a distributed network. In this way, it can avoid the centralized points of failure, eliminating the resource infrastructure bottleneck.
The Vision of IOTA
The vision of IOTA is to enable all connected devices through verification of truth and transactional settlements, which incentivize devices to make available its properties and data in real time. In addition, the IOTA cryptocurrency was developed to enable Machine-2-Machine (M2M) transaction, thus creates the machine economy powered by IoT.
The main objective of IOTA is to serve the machine economy by enabling zero fee M2M payments. IOTA has established itself as the leader in IoT fintech landscape by providing efficient, secure, lightweight, real-time microtransactions without fees. It is open-source and engineered specifically for the Internet of Things. Its real-time microtransactions using the IOTA cryptocurrency has created an ecosystem that is ready and flexible for scale.
The Tangle
IOTA technology is similar to the blockchain technology but it is not blockchain-based. In fact, it utilizes a kind of distributed ledger technology minus the blocks. IOTA is a permissionless distributed ledger that utilizes a cutting-edge technology, known as Tangle. The Tangle is a new data structure based on a Directed Acyclic Graph(DAG). As opposed to the blockchain, it has no blocks, no chain and also no Miners. This unique new architecture enables IOTA works differently compared to Blockchains and other Distributed Ledger Technologies.
The Core Principles
IOTA uses a DAG instead of a blockchain to store its ledger. The main objective is to solve the scalability issue. As we all know, a blockchain has an inherent transaction rate limit, due to the conflict between block sizes and block issuances rates. If blocks are issued too frequently, or are too large, forks will occur often. When a fork happens, several new blocks are added to the chain simultaneously, and the network needs to decide between them, thus slow down the validation process.
In a DAG, forks can still occur but unlike in a blockchain, a fork is not final. In the DAG system, diverging branches can still be merged back together, as long as they are consistent with each other. The transaction rate is therefore bounded only by the latency between the nodes. A DAG favors availability over consistency.
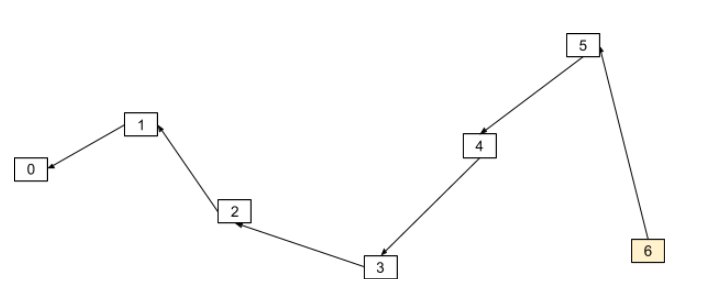
The Tangle Structure
The Tangle is a Directed Acyclic Graph (DAG). In computer science, a directed graph is a collection of vertices (squares), which are connected to each other by edges (arrows). In the IOTA Tangle data structure, the vertices represent transactions, and the edges represent approvals. It retains the blockchain features that include distributed ledger, immutability, and secure transactions, but it does not utilize the blocks.
The Tangle structure is shown in the following figure.
With reference to the figure below, If there is an edge(arrow) directed node (vertex) 100 to node 99, it means that node 100 approves the transaction at node 99. When a node issues a new transaction, it must choose 2 previous ones to approve, thereby adding 2 new edges(arrows) to the graph. Notice that each node must be connected to two previous nodes.
The first transaction in the Tangle is referred to as the genesis. All the IOTA tokens were created in the genesis, and no new ones will ever be created. All transactions in the tangle reference the genesis directly or indirectly.
Transactions with no approvers are called tips. In the figure above, node 100 is a tip because no one approves its transaction yet. All the nodes must choose tips to approve, rather than older transactions, because this helps move the network consensus forwards. The method for choosing which two tips one should approve is one of the key innovations of IOTA.
Setting up a private Ethereum blockchain network is not an extremely difficult task for the coders. However, it may be a bit of a challenge for the beginners. I will skip some technical details and avoid using some jargon so that everyone can understand the basic concepts.
Prerequisites
Before setting up the network, you need to install the following software:
Visual Studio Code
git
NodeJs
Ethereum Wallet
Geth
The go-ethereum client is commonly referred to as geth, which is the command line interface for running a full Ethereum node implemented in Go. By installing and running geth, you can run a private network or participate in the Ethereum main network. By running geth, you can perform the following tasks:
mine real ether
transfer funds between addresses
create smart contracts and send transactions
explore block history
and much much more
Creating the Genesis Block
To set up the private network, we need to create the Genesis block, the first block of the blockchain in our network. The code for the genesis block is written in JSON format. JSON stores data as a name/value pair. For example:
"name": "John"  ,
"age": 30
It uses JavaScript syntax, but the format is text only. Therefore, JSON can be read and used as a data format by any programming language. You can use any text editor to write the JSON code(JSON: JavaScript Object Notation), I use Notedpad++. The sample code for the genesis block is as follows
I will not discuss the contents of the genesis block here. Copy the code in a text editor and save the file as
myGenesis.json
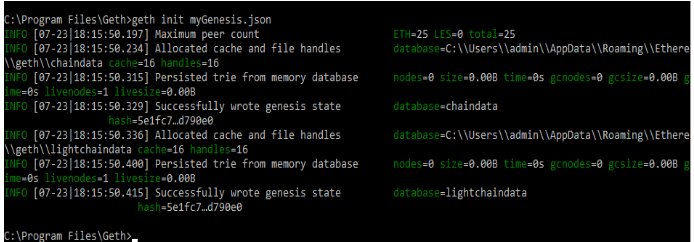
Now run the following command in the command prompt to initialize the genesis block
geth init myGenesis.json
The output is as follows:
Once the genesis block is successfully created, a folder name ‘Ethereum’ will be created in the following path:
“C:\Users\admin\AppData\Roaming\Ethereum”
This folder contains the details of the Private Blockchain.
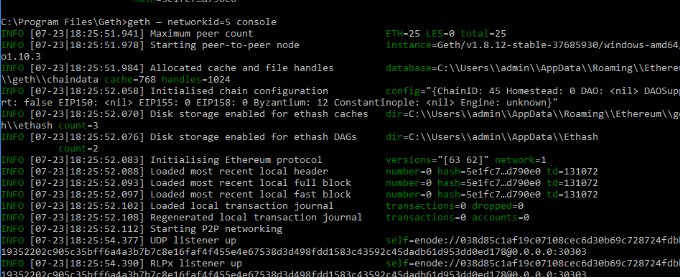
Starting the Private Network
Once the genesis block is created, run the following command to start the private network:
geth — networkid=5
*“networkid=1” stands for the main Ethereum network. So any random number apart from 1 can be given as the network id. Also, “console” is appended to the command in order to enable us to write commands while the network is running.
The output is as follows:
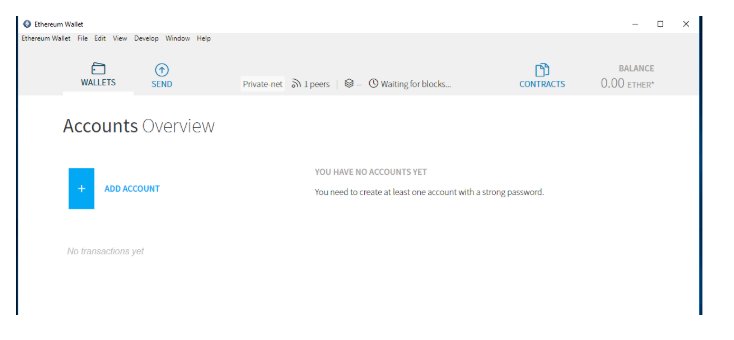
Launching the Ethereum Wallet
The output is as shown in the following figure. Notice that the network name is Private net.
Creating a New Account Address
You can create an address in the Ethereum Wallet application. The address can be created on the Ethereum Wallet App. In the ‘Wallets’ section, click on ‘Add Account’ to create a new account address.
To create new account using the Geth Console, use the following command:
geth account new
The output
Start Mining
To start mining on the private network, Enter the geth console with the following command
Geth --rpc console
In the Geth Console type
miner.start()
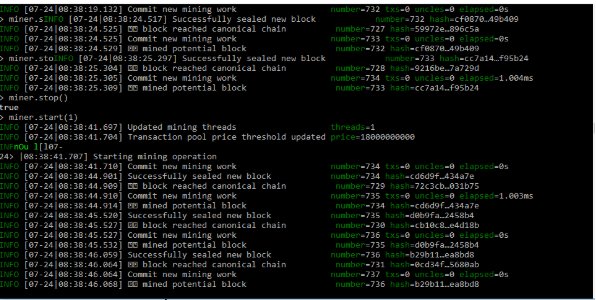
The output is as follows
Now you can see that the mining process is generating Ethers , as shown in the following figure. Bear in mind that these are fake Ethers and can only be used for a private test net.
Stop Mining
Type Ctrl+C in the geth console and key in the following command:
In the blockchain network, a user can send some crypto money to another user in exchange for something of value where the transaction is executed automatically based on a smart contract. In another case, a smart contract is executed when a user acquires a unique virtual kitty from the Cryptokitties collectible marketplace via a bidding process, the highest bidder gets to own the digital asset.
On the other hand, a transaction can occur automatically between two smart devices using an integrated system of IoT technology and blockchain. For example, a smartphone A can top up data for another smartphone B after A received some money from B, the transaction occurs based purely on a smart contract without the awareness of the owners.
According to Investopedia, smart contracts are ,
“self-executing contracts with the terms of the agreement between buyer and seller being directly written into lines of code. The code and the agreements contained therein exist across a distributed, decentralized blockchain network. Smart contracts permit trusted transactions and agreements to be carried out among disparate, anonymous parties without the need for a central authority, legal system, or external enforcement mechanism. They render transactions traceable, transparent, and irreversible.”
Definition of Smart Contract
Based on the aforementioned descriptions, we can define a smart contract as a computer code that can facilitate the exchange of money, content, property, shares, digital assets or anything of value among disparate and anonymous parties without a middle entity.
When a smart contract is installed in a blockchain system, it behaves like a self-operating computer program that automatically executes when some specific terms and conditions are met. Because smart contracts run on the blockchain, they run exactly as programmed without any possibility of censorship, downtime, fraud or third-party interference.
A Brief History of Smart Contracts
In contrary to popular belief, the smart contract is not invented by Vitalik Buterin, the founder of Ethereum. In actual fact, the idea of the smart contract was first conceived by computer scientist and cryptographer Nick Szabo in 1993 as a kind of digital vending machine. In his famous example, he described how users could input data or value, and receive a finite item from a machine, in this case, a real-world snack or a soft drink. Nick Szabo is so smart that some people believe that he could be Satoshi Nakamoto who invented bitcoin.
In addition, though Ethereum is the first blockchain system that has adopted the smart contract technology, it is not the only one using smart contracts. Many Non-Ethereum blockchain platforms such as Hyperledger Fabric, Hyperledger Sawtooth and Corda implement their own versions of smart contracts. The smart contract in Hyperledger Fabric is known as Chaincode that runs in a container known as docker(I will discuss Chaincode and how to install it in Docker in a future article).
Today, most blockchain platforms run on Ethereum Virtual Machine(EVM) implement Ethereum smart contract while a few enterprise blockchain platforms implement their own version of smart contracts. However, there could be interoperability between the Ethereum platform and the enterprise platforms. For instance, in the Sawtooth-Ethereum integration project, EVM (Ethereum Virtual Machine) smart contracts can be deployed to Sawtooth using the Seth transaction family. I will discuss Hyperledger technologies in another article.
Solidity
Solidity is a high-level programming language that is used to create and implement smart contracts on Ethereum platform. The smart contracts created using Solidity can be used for financial transactions, crowdfunding, voting, supply chain management, IoT implementation, ride sharing automation, smart city administration and more.
Solidity has Python, C++ and JavaScript influences. Therefore, it is fairly convenient and easy to grasp for those that are already familiar with the Python, C++ or JavaScript.
Writing and Deploying the Smart Contract
The Integrated Development Environment (IDE)
The best tool to write, compile, test and deploy smart contracts is Remix. Remix is a browser-based IDE that provides an inbuilt compiler as well as a run-time environment without server-side components. You can access Remix from the following link: https://remix.ethereum.org
Besides that, you need to install Visual Studio 2015. I shall skip the technical details for now. (I will discuss how to use Visual Studio Code in compiling and deploying smart contracts in another article).
The Smart Contract Code
A smart contract is a data, that can be referred to as its state, and code, which can be referred to as its functions, collection, that resides on a specific address in the Ethereum blockchain. Let us begin with the most basic example. It is fine if you do not understand everything right now, we will go into more detail later. Enter the follow codes in the Remix IDE and save the file as MyStorage.sol
pragma solidity ^0.4.25;

contract MyStorage {
   uint storedData;

   function set(uint x) public {
       storedData = x;
   }

   function get() public view returns (uint) {
       return storedData;
   }
}
Understanding the Code
The first line simply tells that the source code is written for Solidity version 0.4.25 or anything newer that does not break functionality .This is to ensure that the contract does not suddenly behave differently with a new compiler version. The keyword pragma is called that way because, in general, pragmas are instructions for the compiler about how to treat the source code.
A contract in the sense of Solidity is a collection of code (its functions) and data (its state) that resides at a specific address on the Ethereum blockchain. The line uint storedData; declares a state variable called storedData of type uint(unsigned integer of 256 bits). You can think of it as a single slot in a database that can be queried and altered by calling functions of the code that manages the database. In the case of Ethereum, this is always the owning contract. And in this case, the functions set and get can be used to modify or retrieve the value of the variable.
To access a state variable, you do not need to use the prefix this that is commonly used in other programming languages. This is just a simple contract that does not do much yet apart from allowing anyone to store a single number. This number is accessible by anyone in the world without a feasible way to prevent you from publishing this number. Of course, anyone could just call set again with a different value and overwrite your number. However, the number will still be stored in the history of the blockchain. Later, we will see how you can impose access restrictions so that only you can alter the number.
The Remix IDE
Now enter the code in the Remix IDE, as shown in the following figure:
The Metamask Wallet
In addition, you need to install the Metamask wallet using the Chrome or Firefox extension plugin. After installing Metamask, create an account and connect it to Ropsten Test Network, as shown in the figure below:
Besides that, you need to get some free Ethers to run the test. You can get 1 free Ether for Rospten Testnet from https://faucet.ropsten.be/. Upon loading the website, copy and enter your Metamask wallet address, and click the send me test Ether button, as shown in the following figure:
After a while, you can see 1 Ether is deposited into your Metamask wallet, as shown in the figure below:
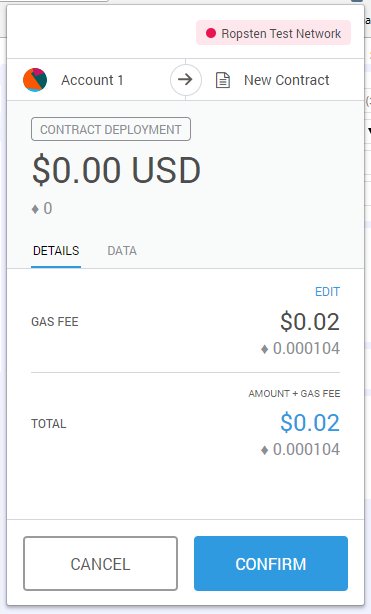
Next, in the Remix IDE, change the environment to Injected web3, the Ropsten Test Network. You can see that your wallet address appears in the account box, as shown in the first Figure. Now click on the Deploy button. After clicking this button, the Metamask wallet will pop up, prompting for confirmation, as shown in the following figure:
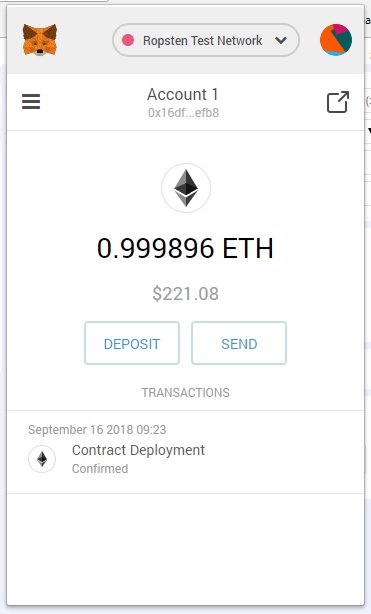
After clicking the CONFIRM button, you will see that some Ether had been deducted from your account which showed that the contract has been successfully deployed, as shown in the following Figure:
Besides that, you can also view the transaction on Etherscan, as shown in the following Figure:
Finally, you can also check the deployment of the smart contact in the Remix debug window, as shown in the following figure:
In addition, you can view some extra information on the right column on the Remix windows, like the name of the smart contract(Mystorage) , how much gas limit and how many transaction etc.
If you are sure the smart contract is bugs free, you may want to deploy it to the Ethereum Mainnet. In that case, change the Environment to Web3 Provider. You will be prompted with the following dialog:
Wait, you need to install Go Ethereum, the client commonly referred to as geth, which is the command line interface for running a full Ethereum node implemented in Go. Install Go Ethereum from the following link: https://geth.ethereum.org/downloads/
After installing Go Ethereum, there a few more windows system set up before you can run geth. I will not go through the steps here, a bit tedious, I have documented them in another document. If you are keen I can share it with you in the future. Let’s say your environment is ready, you can key in the following command in the command line:
Your computer will now link to the Ethereum mainnet via Remix, as shown in the following figure:
Now click OK on the Remix dialog and bring up the next dialog that prompts you to connect to the Web3 Provider Endpoint, as shown in the figure below:
Click OK and now you can deploy the contract to the Ethereum Main Network. Notice that now the Environment is Web3 Provider, which is the Ethereum Mainnet, as shown in the following Figure:
Before you can deploy the smart contract to the Ethereum mainnet ,you need to have the actual Ether to deploy the contract. I suggest you don’t do it here unless you have developed the actual use case and ready to go for ICO.